Max Skilling guide
01/03/26
Max and Comp Cape / Skilling Guide – Mythx RSPS
Unlock Custom Prayer & use XP Scrolls from the Gem Shop for faster progress.
Max Cape Benefits
- x2 Experience in skills
- x2 Vote Rewards
- 2x Trivia Points
- 2x Season Pass experience

Completionist Cape Benefits
- 2x Achievement Progress
- 2x Vote Rewards
- 3x Trivia Points
- 2x Slayer Experience
- 3x Season Pass experience

Best Time to Train
Double XP Weekend
Saturday 8am UTC+1 → Monday 8am UTC+1
- Ensure Well of Goodness is full
- Activate Voting XP Scroll
Skill Progression Order
Fishing → Cooking → Mining → Smithing
This Progression Order will highlight the use of the Creative Workshop Minigame.
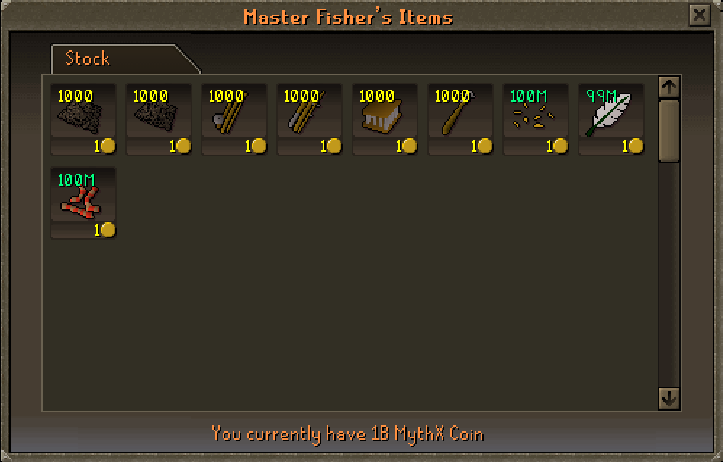
- To get started, you will begin by gathering your required equipment. Open your Skills tab and click the fishing skill. Click the lever in the bottom-right corner of the teleport interface. Once there, trade the Master Fisher and purchase a fly fishing rod along with a sufficient supply of feathers.
- It's Time to skill! Click your spells tab, and click Minigames Teleport. Select the Minigames column and pull the lever.
- Once you arrive, run over to the edge of the dock, and click on a tile of water to start fishing.
- It is recommended to fish until level 120, as it should give you enough fish for the next part
- Now that you've hit level 120 in fishing, it's time to return to the opposite end of the dock and begin cooking supper!
- Click on the fire, and right click the space fish chat option in the pop-up. Click the X, and type in 2000 This way you don't stop cooking until you finish your inventory.
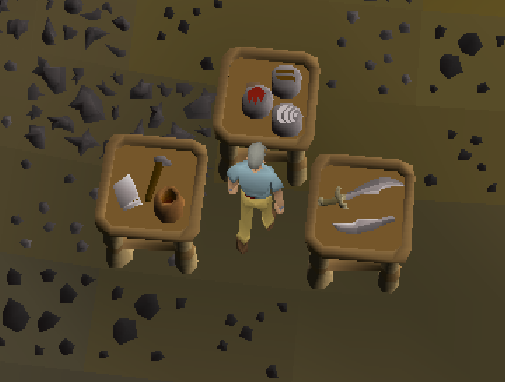
- Now we start the Mining/Smithing Portion of the Creative Workshop. Start by opening your skills tab and clicking the mining teleport and selecting the Mining Guild option.
- Talk to the Mining Instructor to trade. Buy a Rune pickaxe. We will use the bronze pickaxe we started with, to get us to Level 41 Mining to use the Rune Pickaxe.
- You will need to make your way north from the docks, into the cavern to find the Space Rocks.
- You will mine Space Rocks until level 120 Mining, which should give you enough ore for the Smithing Section.
- Once you've hit level 120 Mining, it's time to turn your ores into bars. Click on the Space Furnace just a little bit West of where you were mining ores.


Evolution
Sleepy Time.
- Use Command ::afk to teleport to begin leveling.
- Start with Evolution Energy Source 1
- Evolution Energy Source Level Requirements:
- Evolution Energy Source 1 - Level 1
- Evolution Energy Source 2 - Level 10
- Evolution Energy Source 3 - Level 20
- Evolution Energy Source 4 - Level 35
- Evolution Energy Source 5 - Level 50
- Evolution Energy Source 6 - Level 70
- Evolution Energy Source 7 - Level 90
- Evolution Energy Source 8 - Level 97
- Evolution Energy Source 9 - Level 104
- Optional: Teleport to Royal Donator zone, and obtain Five 2x Evolution Experience and 2x Evolution Essence scrolls to boost experience rates and loot!
Pro Tip: Start Evolution early and AFK overnight.
Infusion / RC / Mining Skill Progression Order
Mining → Runecrafting → Infusion
This order of progression will require at minimum Level 31 mining for pure essence.
- Click your Mining skill and teleport to the essence mine. Click the rune essence in one of the corners and select option two, pure essence, to begin collecting.
-
After collecting a considerable amount of essence, head to ::home and proceed to the altar.

- Now you will begin Runecrafting, Starting with an inventory of Air runes.
- As you level up you will unlock higher tier runes. Do the highest tier possible for your current level.
- Right-clicking the altar and selecting the Repeat-Last option will toggle an effect that makes your clicks on the altar automatically create the last rune you crafted. Select the option again to turn it off.
- After Stocking up on runes, we begin Infusion.
- Start with the Starter weapons, Move onto the highest tier possible.
- Each Tier of weapon will have a level requirement.
- Occult Staff - Knight Longsword - Overseer Bow (level 1)
- Fanatic Sword/Staff/Bow (level 16)
- Glorious Bow/Wand/Glaive (level 25)
- Trinity Staff/Crossbow/Scythe (level 43)
- War-Bane Staff/Bow/Sword (level 61)
- Ember Shooter/Ardent Staff/Cyclonic Reaper (level 76)
- Ballistic Minigun/Witchling Staff/Wicked Whip (level 79)
- Demonic Scythe/Staff/Bow (level 82)

Pro Tip: Use Save Infusion Charges prayer to use less weapon charges per attack.
Woodcutting / Fletching / Firemaking Skill Progression Order
Woodcutting
This progression path provides an alternative way to train Woodcutting while also leveling Fletching and Firemaking.
- You will begin by going to your skills tab and clicking the Woodcutting Skill and selecting the first option. Once you arrive, you'll want to talk to Wilfred and buy a iron axe, Dragon Hatchet and grab a infernal knife while you're here.
- Start by chopping a tree next to Wilfred this should give you the level that unlocks willows(if it doesn't, quite get you there, chop another).
- Next a few tiles north of Wilfred will be a Willow Tree, chop it until you reach level 45.
- Once you hit 45, you will unlock Maple Trees. You have Two choices, chop maple trees until level 75 to unlock magic trees, or until 60 and chop yews until you unlock magic trees.
- Once you unlock Magic Trees, you can choose to either go to ::resource and chop magics there, or click on the woodcutting skill in the skills tab and teleport to the High-Level Woodcutting spot.
- Now that you've hit 120 in woodcutting, you can choose to either Firemaking or Fletching.
- We will choose to level fletching next.
- You will begin by fletching some Arrow shafts once you reach level 5, you will fletch the best log you can at your level, according to the list below.
- (Light) Shortbow (level 5) / Longbow (level 10)
- Oak Shortbow (level 20) / Longbow (Level 25)
- Willow Shortbow (Level 35) / Longbow (Level 40)
- Maple Shortbow (Level 50) / Longbow (Level 55)
- Yew Shortbow (Level 65) / Longbow (Level 70)
- Magic Shortbow (level 80) / Longbow (Level 85)
- Once you finish your stack of magic logs, you can finish up leveling to 120 by stringing magic short and longbows.
- Start by heading to your skills tab and clicking on the crafting skill. From there you can choose to either. Buy bowstrings from the Master Crafter and string the bows, or buy flax and gain crafting experience while you finish up Fletching.

Farming → Herblore Skill Progression Order
I Hope you are ready for Arthritis Simulator.
- Begin Farming by heading to your skills tab, and clicking on the Herblore skill.
- Grab yourself a considerable amount of each seed (grab 5 potato seeds to get your first set of levels)
- Start by raking the Allotment patch north of the Farming Shop. Once there are no weeds in the patch, click your potato seeds, and use them on the patch.
- Repeat the same process with herb seeds now.
- Plant the best seed possible according to the list below
- Guam Seed (level 9)
- Marrentill Seed (Level 14)
- Tarromin Seed (Level 19)
- Harralander Seed (Level 26)
- Ranarr Seed (Level 32)
- Toadflax Seed (Level 36)
- Irit Seed (Level 44)
- Avantoe Seed (Level 50)
- Kwuarm Seed (Level 56)
- Snapdragon Seed (Level 62)
- Cadantine Seed (Level 67)
- Lantadyme Seed (Level 73)
- Dwarf Weed Seed (Level 79)
- Torstol Seed (Level 85)
- Now that you have lost feeling in your wrist, it's time to start herblore.
- Head to your skilling tab and click on Herblore. Start off by trading the Herblore Shop NPC. Buy the Book on Baxtorian This will be your guide to leveling. *Dance break*
- Clean the herbs you recieved from farming, and buy an absurd amount of Vials of Water. Use the herbs on the vials to create unfinished potions, and use the according Secondary (Refer to Book on Baxtorian) to create your potion.

Creation
Literally so easy, your dog's uncle could do it
- This skill will require patience, and a good amount of resources.
- Open your skilling tab up, and click on the Creation Skill. In the Tier 1 tab, scroll down until you see the Trinity instance.
- Each instance requires: 1x Glorious Instance, 400x Mythx Coins and 40x Creation Tokens. You will create this until Creation Level 120
Told you so.
Hunter
If farming wasn't enough, this should finish you off
- You will want to go to ::shops and trade the shopkeeper. Buy 1x Butterfly net and 10-20x impling jars, once we reach 23 Hunter we can access more hunter equipment
- We will teleport to Puro-Puro (click hunter skill and select first teleport option) from there we are going to hunt some imps according to the list below.
- Baby Impling - Level 1
- Young Impling - Level 17
- Gourmet Impling - Level 34
- Earth Impling - Level 34
- Essence Impling - Level 40
- Eclectic Impling - Level 50
- Nature Impling - Level 58
- Magpie Impling - Level 65
- Ninja Impling - Level 74
- Dragon Impling - Level 83
- Once you hit Level 29 hunter, click the hunter skill in the skills tab and select "Karamja - Trap Area(23 Hunter Required)" From there you will buy bird snares and go a little north and start catching birds until 60 hunter
- Once you reach level 60 in hunter, yoi will start hunting chins. This will be the fastest experience in game for hunter. You will start out by clicking the hunter skill in the skills tab and selecting the "Karamja - Trap Area(23 Hunter Required" From there you will click on the Hunting Expert and you are gonna stock up on 5+ traps.
- Return to where you were catching birds, There will be some Grey Chinchompa spawns, catch enough to achieve level 63 Hunter.
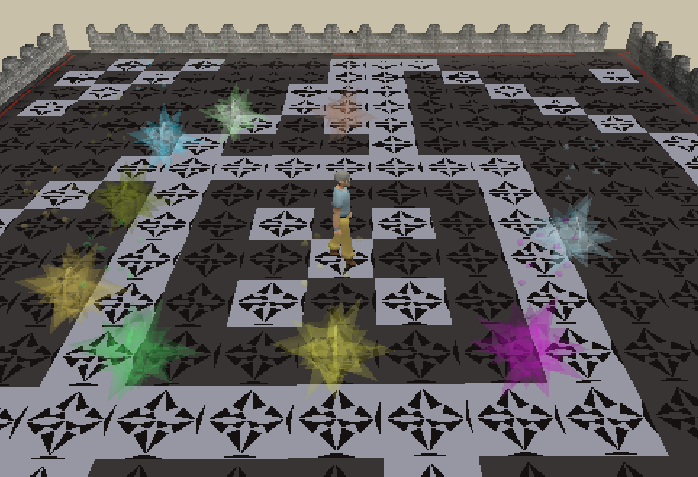
- Now the real grind begins, click on the cooking skill in your skilling tab, go north of the Evil Dave Cofferand place your traps on the tiles in the image below.


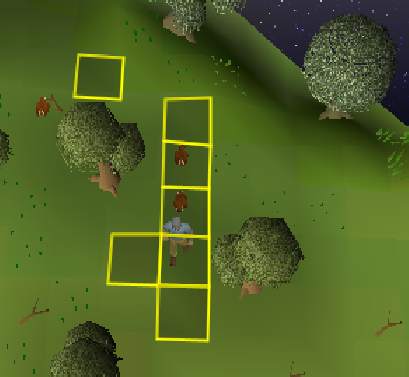
Tip: The tiles west and south, of the one that the character is standing on, are spawns for the chins, placing a trap on these tiles can be tricky.
Thieving
Who knew stealing could be so boring?
- To start off, you will want to swap over to the skill tab, and click on the thieving skill. You'll be teleported infront of four stalls, you'll start with the banana stall until level 30.
- Once level 30 you will begin stealing from the Jewellery Stall until level 60.
- Once you hit level 60 thieving, you will want to enter ::resource and begin the grind.
- Facing South, You will begin with the Stall on the left until level 65. Then Start stealing from the stall north of you until level 80.
Tip: Dissolve your collected items or do command CTRL+B for faster banking.
Crafting
Level Crafting 1 to 120 without ever moving.
- Head over to your skills tab, and click on your crafting skill. Once there, click on the Master Crafter and buy 2 flax and spin it on the spinning wheel right next to the Master Crafter.
- Now you will buy the gems needed to level all the way to 120. Cut gems according to the level list below.
- Opal - Level 8
- Jade - Level 13
- Topaz - Level 16
- Sapphire - Level 20
- Emerald - Level 27
- Ruby - Level 34
- Diamond - Level 43
- Dragonstone - Level 55
- You will do Dragonstone until level 120.
Prayer
Easily obtained through doing 250 killcount, of the Starterzone boss
- Once finished with 250 KC of Starterzone Boss, teleport home using command CTRL+H.
- Head over to the Occult Altar in the Southeastern corner. Use the Boss Bones on the altar, right click the prompt, and select X and type in a large number.

Agility
You knew this was the worst, yet you still saved it for last...
- Start off by clicking on the agility skill, in the skills tab. Select the first option Gnome Course. Run a few laps untl you reach level 55.
- Now that you've hit level 55, its time to spend the weekend leveling to 120.
- If you fall on the rope-swing, you must go back and reswing. Or else you will not finish the course, and you will miss out on the tickets and experience for not completing the lap.

Tip: You get Agility Tickets per lap, each ticket provides 500 Agility Exp Per ticket. Use a 2x Agility Experience ring.